Ubuntu system hardening guide for desktops and servers
The system hardening process of a system is critical during and after installation. It helps the system to perform its duties properly. This blog post shows you several tips for Ubuntu system hardening. It will dive into the most critical steps to take first. Then more specific hardening steps can be added on top of these. As most security guides only tell you what to do, we will also go into more detail on why a specific security measure is important. This way you can make educated decisions on what steps you want to do, or the ones to skip. After all, each system is different.
Supported operating systems:
- Ubuntu 20.04 LTS desktop and server
- Ubuntu 22.04 LTS desktop and server
- Ubuntu 24.04 LTS desktop and server
Most of the steps will work on Ubuntu versions before and after these releases. This guide will cover both the desktop and server versions.
Ubuntu is already secure, right?
Every Linux distribution needs to make a compromise between functionality, performance, and security. While Ubuntu has secure defaults, it still needs tuning to the type of usage. Ubuntu desktops and servers need to be configured to improve the security defenses to an optimal level.
System hardening
If you are new to system hardening, let’s start with a definition:
System hardening is a technical process of increasing the security of a Linux system by reducing its attack surface. Those items that pose the most risk to the system are adjusted by taking specific security measures. This can be done by adding, adjusting, or removing certain components of the Linux system.
During this steps in this guide, we will apply a combination of measures to improve the security of your Ubuntu installation and configuration. Although there are some specific Ubuntu security features, most of the hardening tips can be universally applied to other Linux distributions.
Desktop versus server
The process of Ubuntu system hardening is very similar for desktops and servers. The only difference is the purpose of the machine. Desktop users are most likely using it for browsing the web or reading emails. Privacy might be an important focus area. These activities are less likely on servers, where typically data integrity and availability are more important. So while the hardening steps are similar, keep always the role of the system in mind.
Hardening steps during installation
The first few hardening improvements can be done during the installation. If you already have a system running, the most likely these steps can’t be easily applied after the fact. Consider reinstalling the system, or use the hardening measures as part of a future installation.
Use strong passwords
After the first installation steps, the creation of a user account is performed. This user will be added to the administrative group, allowing him or her to become root. For this reason, the password should be a strong password.

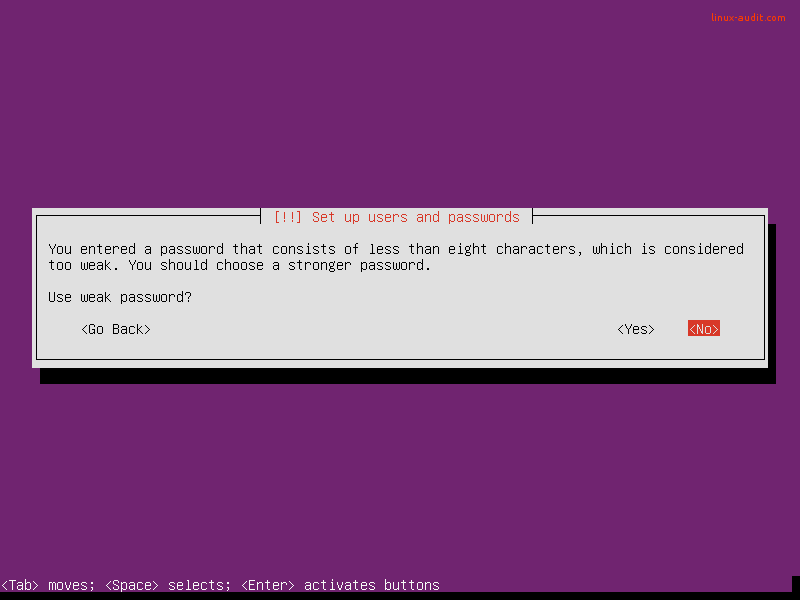
A bad start of server hardening. Instead, use strong passwords.
Why a strong password matters: weak passwords don’t belong on systems. Not during development and especially not for production purposes. This is a serious risk as automated tools can perform many guesses per second, often discover weak passwords in just a few seconds. So system hardening should also apply to the strength of your passwords.
Tips to enhance your password: use longer passwords to make brute force password guessing much harder. One trick that is simple and powerful is adding a single character many times to your password (e.g. add 10 dollar signs at the beginning). Besides increasing the length, the variety of used characters is important. Add capitals, numbers, and other characters.
Use disk encryption
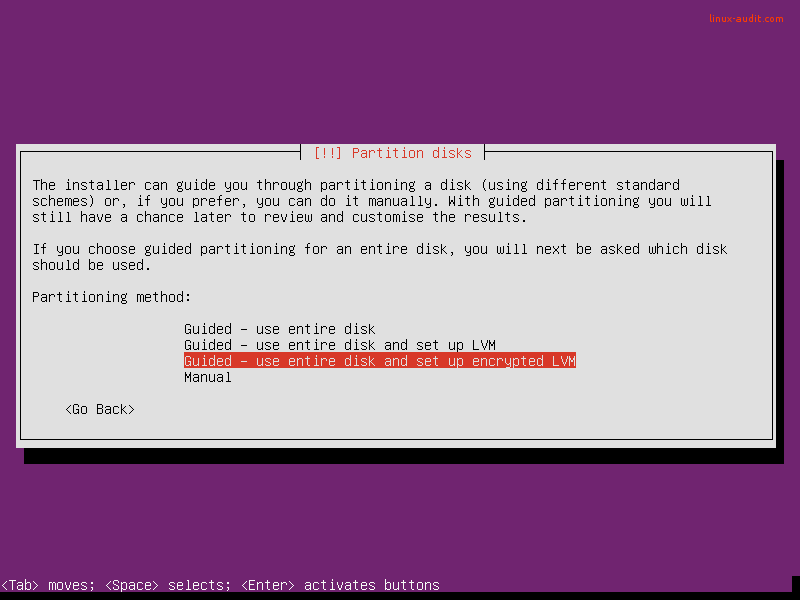
Enable encrypted LVM volumes during the installation of your Ubuntu desktop or server system. It is a great measure to hardening the system and data in particular. Although it won’t protect against all attacks, it matters for what we call data at rest. This means that when your system would get stolen, the data can only be retrieved if the attacker has the related key or passphrase to decrypt the data.
Select the guided partition method with “use entire disk and set up encrypted LVM”.

Next step is selecting a passphrase. This is used during the boot process, to unlock the disk (or volume).

Make it a good passphrase: longer is better
Why disk encryption matters?: Your system may be stolen, even if it is a server. Another possibility is that you have to return a broken disk. In both cases, others should not be able to read data stored on the disk.
Automatic security updates
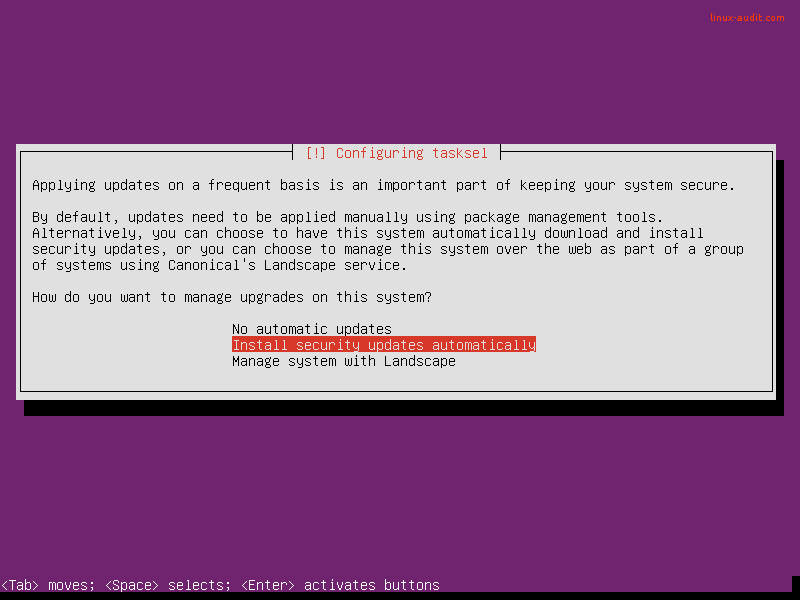
Every server needs software packages to fulfill its destiny during the lifetime of the system. Ensure that it gets regularly patched and updated by using unattended-upgrades. This is done with the “Install security updates automatically” option during the installation.

Why applying automatic security updates matters: almost daily new weaknesses are detected in software packages. This is no different for Ubuntu servers. Although most administrators rather not update their systems automatically, applying only the security updates is a relatively low-risk action. This is because no new features are introduced, only security flaws are patched. After that is done, a new software update is released to solve the related vulnerability. These updates are often linked to a CVE number (Common Vulnerabilities and Exposures), which provides more information about the vulnerability itself. So don’t take risks and apply those automatic security updates.
Minimal installation
The Ubuntu installation has been improved over the last years. It already applies the “lean” principle. This way it will only install what is really needed. The administrator can still select additional packages or software groups. There is the possibility to add new software groups at the end of the installation process or do it manually later on. Our security tip is to only select the groups and services which are really needed. For server systems, it makes sense to select the SSH server role. This way OpenSSH and the SSH daemon will be installed.

Only select what you really need, adding more is still possible later
Why a minimal installation matters: Ubuntu has the tendency to enable installed services and start them by default. This means that if you just install a package, it may actually already be running with weak configuration defaults. Security professionals speak often about the footprint or attack surface. This means that the risk of a breach increases if you have more packages you have installed. And not just packages, also the number of services running or (old) users enabled. In other words, each package, service, or user is increasing the chance that your security defenses will be breached.
Hardening steps after installation
After you have your system installed, it is time to configure the system. This is also the phase in which your security defenses can easily be weakened. So each time you perform activities on your servers, consider what it does for your overall security level of the server.
Software updates
During the installation, there was the option to select automatic security updates. If you already had a system running, you can add this component easily by installing the unattended-upgrades package
apt install unattended-upgrades
Although this package works fairly well out of the box, you might want to check its configuration. This is because only packages from the security repository are updated. Others are skipped. So look for external repositories that may be available to the system and consider adding those packages to the configuration. The configuration file of unattended-upgrades is /etc/apt/apt.conf.d/50unattended-upgrades. For more details regarding the configuration, have a look at our more in-depth article about unattended-upgrades.
Besides security updates, we suggest to regularly plan a moment to install normal updates. Often they contain improvements to improve system stability. Especially on servers, this is of high importance.
Earlier Ubuntu releases:
apt-get update && apt-get upgrade
Ubuntu 16.04 LTS and later:
apt update && apt upgrade
Accounts
Besides the required software packages, systems can only work if it allows users to make use of it. In some cases, we will be giving them access to the server, especially for system administration purposes. Also for web servers, it is common to see that users can access the system directly via SSH and SCP, to allow updating the website of the user.
Related risks to user accounts
There are a few risks with user accounts on systems, especially on servers. Hardening in this area is therefore required. The first risk is that local users may use local exploits to elevate their permissions and become root. Fortunately, this can only happen if there is actually a known weakness and when the user is skilled enough to run the related malicious script or code. Unfortunately, it is common to see Linux servers running for years, without a single reboot. Even when security updates are automatically installed, an update to the kernel still requires a system restart.
The second risk is that old accounts may be lingering on the server too long. Sometimes employees or customers that no longer for the company. When these accounts have a weak password, they might be abused one day. To counter this, set a password policy and delete accounts when they are no longer needed. This last one is a difficult one, as you may need a strict process to control who can access the system and a way to determine the user has no business on the related system anymore.
Configure PAM: pwquality
PAM is an abbreviation for pluggable authentication module. It extends the existing functionality of the authentication steps, allowing for a very fine-grained configuration. PAM is usually a little bit scary for those who are new to its configuration, as there is not a clear path it follows. Files are including each other and have sometimes cryptic names. Still, don’t be scared and test your changes first on a virtual system where you always have root access. Create an additional test user and log in with that, to help with testing.
The first step is to install the PAM component “pwquality”, short for password quality.
apt install libpam-pwquality
One of the things we learned earlier is that a longer password is more secure. This is because it usually takes more time to crack by automated tools. So if you want to increase the minimal password length for all users, we have to configure that in the PAM configuration.
Open the file /etc/pam.d/common-password in a text editor and search for the line that has the pam_pwquality.so reference in it. By default, it only includes “retry=3”. This number refers to the retries a user has before PAM will show that the authentication has failed and disallow access.
As we want to increase the minimal password length, we add “minlen=10” just before the retry parameter.
password requisite pam_pwquality.so minlen=10 retry=3
Save the file and then switch to your test user in the other terminal. Now use the passwd command and try to use a short password like 123456. If things are properly configured, that should fail.
Next step is to add complexity rules to pwquality module. This can be done with the parameters: dcredit, ucredit, lcredit, and ocredit. See the man page for their details and again test your changes.
man pam_pwquality
Besides this password length and complexity, we can also configure how often a user should change his or her password. This is done via /etc/login.defs with the options PASS_MIN_DAYS and PASS_MAX_DAYS. By default, the maximum days are set to 99999 days and might need to be tuned down. For more sensitive systems this number should be fairly low, like every 30 days.
Firewall installation and configuration
Now that we implemented a few measures, it is time to look at the network services. Even systems that are already filtered by a network-based firewall, might still benefit from a local firewall. There are a few options available when it comes to Linux firewalling, including UFW and iptables.
Firewall options
The best firewall for Ubuntu is the one that you can actually manage. The most common option is iptables. This filtering engine exists for a while and is rock-solid. Its syntax is not that friendly compared with others like pf on BSD. Still, it does the job and gradually you become better at it. UFW or Uncomplicated FireWall is a good option for those that want to apply some simple rules. UFW will take care of generating the required rules for iptables.
Why use a firewall on Ubuntu?
An important reason to use a firewall is to protect against other systems in the local subnet. Let’s say you enabled SSH on all your servers and filtered SSH traffic on your network firewall. Other systems could still use the service internally. In case one system is breached, others might get breached as a result. So one option could be to allow SSH only from predefined systems, like your bastion hosts (a.k.a jump server or stepping stone).
Another reason to use iptables or other firewall solutions is to block bad traffic. Sure, it is better if you can do this on a network level, but sometimes only the receiving system can make the decision what traffic is good or bad. Especially when traffic is encrypted, like HTTPS. The receiving server has a better idea on what is going and may decide to start blocking a particular client when it had too many invalid or malicious requests.
A basic iptables configuration could be looking something like this:
# Accept all incoming traffic on local interface
iptables -A INPUT -I lo -j ACCEPT
Next step is to allow traffic to our services:
# Allow traffic to SSH (to port 2222), SMTP (25), and our web server (80, 443)
iptables -A INPUT -p tcp -m tcp -dport 2222 -m state -state NEW,ESTABLISHED -j ACCEPT
iptables -A INPUT -p tcp -m tcp -dport 25 -m state -state NEW,ESTABLISHED -j ACCEPT
iptables -A INPUT -p tcp -m tcp -dport 80 -m state -state NEW,ESTABLISHED -j ACCEPT
iptables -A INPUT -p tcp -m tcp -dport 443 -m state -state NEW,ESTABLISHED -j ACCEPT
Finally, drop all other traffic in the input chain:
iptables -A INPUT -j DROP
This simple configuration is just a start. It still allows outgoing traffic, which might need some filtering as well.
Using AppArmor security framework
Two well-known Linux security frameworks are SELinux and AppArmor. The choice for which framework on systems running Debian and Ubuntu is easy. Only AppArmor is available. This is because only support for this framework is compiled into the Linux kernel.
If you really want to harden your Ubuntu systems, then AppArmor is a great addition. This framework defines what running processes can do, or access. Think of it like a prison guard that continuously monitors its prisoners, to ensure they only do activities that are allowed. The allowed activities are stored in policy files, together with the related processes.
To determine the current status of AppArmor, use the aa-status command.
Read more about AppArmor in the Linux security frameworks section
AppArmor modes: disabled, complain, or enforcing
AppArmor can run three different modes. The first of all is disabled. In this mode, AppArmor will simply ignore the policies and not restrict any process. In complain mode, AppArmor will perform monitoring, and only notify when a process is performing an unauthorized action. The most restricted mode is when AppArmor is enforcing. All unauthorized actions are blocked and logged.
To learn more about AppArmor, have a look at the AppArmor server guide.
Next steps for system security
Now that you implemented the basic Ubuntu hardening measures, it is time for the next steps. These steps include:
- Implementing sudo
- OpenSSH security and hardening
- Hardening of compilers and development tools
- Check for malware
- Web server hardening
- Detection of malicious traffic
- Install file integrity monitoring
- Configure backups
- Create AppArmor profiles for programs
- Perform an in-depth Linux security audit
We will be adding more links for these subjects with step-by-step instructions.
Ubuntu security tools
Security assessment with Lynis
If you like to learn what can be improved on your system, use the open source security tool Lynis. This tool is not restricted to Ubuntu. It performs hundreds of individuals tests to detect possible weaknesses of the system. Besides that, it comes with a report that shows suggestions, or room for security improvements on your system.
More resources
The web has a lot of resources available when it comes to system hardening, including for Ubuntu Linux. Our experience is that there are a lot of low-quality articles, with just some steps to apply and without any reasoning behind it. Avoid those, as they usually have bad examples that can even introduce weak security weaknesses!
Useful learning resources
Do you learn something during following this guide? Great! Become part of the community and share this article on your favorite website or on social media. Got questions or ideas to enhance this guide? Use the comments!

