Using SSH keys instead of passwords
Linux systems are usually managed remotely with SSH (secure shell). Still many administrators are using passwords, instead of keys. Keys not only boost security, it also makes managing systems much easier. Instead of entering your password for each server, you only have to do it once per session. When managing several systems per day, you will be wondering why you ever used password based authentication before.
Generating the SSH key
Depending on your desktop platform, we first have to create a key pair. This will consist of a public and private key, which are both needed to work. The private key is private and should remain private. While not mandatory, it is very wise to protect it with a password. The public key will be configured on the remote system. This key is not secret at all, therefore it can safely stored on another machine, or even shared with others. Since people still make the mistake of sharing the private key, reassure yourself what key you are sharing at any given time.
PuTTY
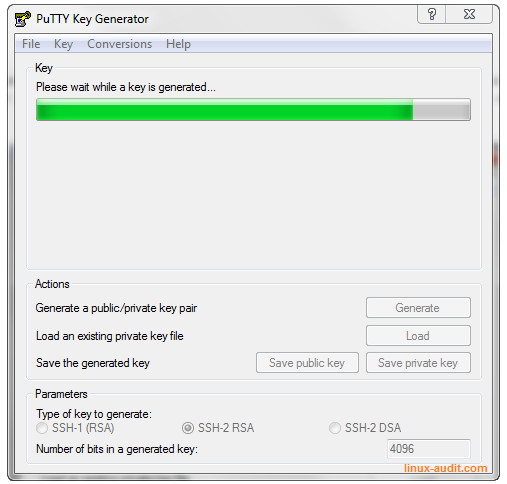
Windows users can use the PuTTYgen utility to create a key pair. This tool is part of the full installation of PuTTY, or can be Downloaded
manually.

PuTTYgen creating the keypair
ssh-keygen
For users who will do management from a central system, or run Linux (or any other Unix based system), can use ssh-keygen. If you need to support recent OS versions, it is suggested to use the newer Ed25519 key format. Otherwise, use RSA.
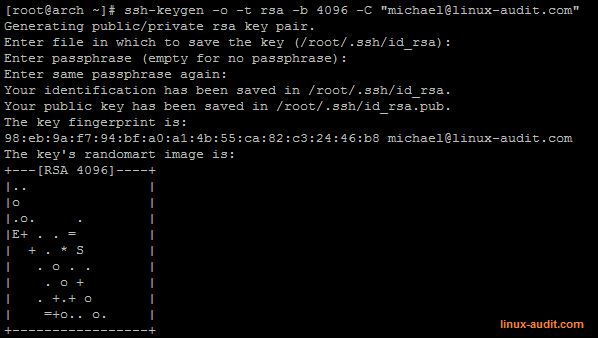
ssh-keygen -o -t rsa -b 4096 -C "myname@example.com"
The output would look something like this:

ssh-keygen command creating a 4096-bit RSA key
Now check your created key and see if it is of the right type and bit size.
# ssh-keygen -l -f .ssh/id_rsa
 4096 98:eb:9a:f7:94:bf:a0:a1:4b:55:ca:82:c3:24:46:b8 .ssh/id_rsa.pub (RSA)
As you can see in this example, the tool will select the public key, even if you don’t provide they private key.
Copying the key
Next step is copying the key to the other system. The easiest way is using the ssh-copy-id command. Just provide it with the “ID” to copy and your username and hostname of the remote system.
# ssh-copy-id -i ~/.ssh/id_rsa.pub michael@192.168.1.251
The authenticity of host '192.168.1.251 (192.168.1.251)' can't be established.
ECDSA key fingerprint is b7:39:02:6a:f3:be:42:c3:d8:69:c4:7f:4e:9b:0b:f3.
Are you sure you want to continue connecting (yes/no)? yes
/usr/bin/ssh-copy-id: INFO: attempting to log in with the new key(s), to filter out any that are already installed
/usr/bin/ssh-copy-id: INFO: 1 key(s) remain to be installed -- if you are prompted now it is to install the new keys
michael@192.168.1.251's password:

Number of key(s) added: 1

Now try logging into the machine, with:   "ssh 'michael@192.168.1.251'"
and check to make sure that only the key(s) you wanted were added.

[root@archtest .ssh]# ssh 'michael@192.168.1.251'
Enter passphrase for key '/root/.ssh/id_rsa':
Last login: Sun Dec 21 23:49:57 2014 from arch<
Another option is to do it manually, or copy it via SCP. These steps can also be used when you created a key for PuTTY. If you used PuTTYgen to create the key, it will give you the string to add to the authorized_keys file. Something like “ssh-rsa AAAA[long string]= rsa-key-20150316”.
# ssh username@remote-system
mkdir ~/.ssh
chmod 700 ~/.ssh
edit ~/.ssh/authorized_keys and copy the public key
chmod 600 ~/.ssh/authorized_keys</pre>
Now try logging in and see if your key based authentication is working.
Using an agent
By using an agent utility, we can leverage caching of our credentials. The ssh command (or PuTTY) does not have to ask us each time the passphrase, but requests it from the agent.
PuTTY agent (pageant)
When using PuTTY, the nifty utility pageant is the PuTTY authentication agent. Start the utility and right click on the icon in the task bar to add a key. Provide your password and that’s all.
When logging in with the agent, we see something like “Authenticating with public key “rsa-key-20150316” from agent”.
If you can’t log in without password:
- The key was not accepted (see event log within PuTTY)
- The authorized_keys file has incorrect file permissions
- PuTTY is not configured to use the SSH agent
With ssh-agent
First run the ssh-agent.
# ssh-agent
SSH_AUTH_SOCK=/tmp/ssh-zo47izH0ZcYM/agent.1133; export SSH_AUTH_SOCK;
SSH_AGENT_PID=1134; export SSH_AGENT_PID;
echo Agent pid 1134;
This output can be used to configure the SSH agent. For most systems the following steps can be used to use the agent.
First use eval to determine if the agent is running:
eval $(ssh-agent)
Next is to add this to your .bash_profile (or your other shell configuration files).
echo 'eval $(ssh-agent)' >> ~/.bash_profile
Now we add the key to the agent cache with ssh-add.
ssh-add ~/.ssh/id_rsa
It should respond with a message like “identity added”. Now you can use ssh and connect to your configured system(s) without a password.
Systemd
When using systemd, you might want to create a systemd service file.
/etc/systemd/system/ssh-agent.service
[Unit]
Description=SSH key agent

[Service]
Type=forking
Environment=SSH_AUTH_SOCK=%t/ssh-agent.socket
ExecStart=/usr/bin/ssh-agent -a $SSH_AUTH_SOCK

[Install]
WantedBy=MyTarget.target
Add the following line to your shell .profile file (e.g. .bash_profile):
export SSH_AUTH_SOCK="$XDG_RUNTIME_DIR/ssh-agent.socket"
Now enable and start the service:
systemctl enable --now ssh-agent.service
Server configuration
If you only want to use keys, you can now disable password based authentication. Ensure that your configuration is working correctly, before doing so. When you are sure, update your /etc/ssh/sshd_config configuration file.
PasswordAuthentication no
ChallengeResponseAuthentication no
Last but not least, restart your SSH daemon.
systemctl restart sshd.service
Happy hardening your SSH configuration!

