Granting temporary access to your servers (using signed SSH keys)
This article has last been updated at .
In need of support from a colleague or vendor, but don’t want to give them permanent access? SSH has an option to allow temporary access! Next time you need to provide temporary access for an hour or day, use this great option.
Configuration
We have two machines for this purpose. One is a system running Arch Linux, the client system. The other one is a server, running Ubuntu Linux. For temporary support, we have created a functional account support on the Ubuntu server. In the examples along the road, user michael is the one providing the support. So we are going to give him access to the support account. Temporarily!
Suggestion: On each of the machines running commands, set your umask correctly (e.g. umask 077). Otherwise, files will be created with loose permissions, and result in errors later on.
Creating a Certificate Authority
The first step is to create a CA key. This key will be used to sign the public key of the user providing the support. Ideally, this key creation should be done on a secure system.
ssh-keygen -f ssh_ca
This should result in two files:
- ssh_ca (private key)
- ssh_ca.pub (public key)
Want to have a more secure key? Use the -b parameter and increase it to 4096 bits.
The signing process
After creating the CA key pair, it is time to sign the user public key with the CA key.
Create an SSH key pair for users
If you don’t have an SSH key pair for your user account, create one first.
ssh-keygen -t ed25519 -C "my key for purpose X"
Signing the user key
Now we need to copy the public key of the user, to our system which holds the CA key. This way we can sign the public key. Use SCP or e-mail to transfer it to the machine. For our demo purposes, we will perform all the actions on the same system. Don’t do this in production and keep keys properly separated.
Time to do the signing. In this example, we use an Ed25519 public key. Replace it with id_rsa.pub if you used a RSA key.
ssh-keygen -s ssh_ca -I michael -n support -V +1d ~/.ssh/id_ed25519.pub
So what does this command do?
| Parameter | Purpose |
|---|---|
| -s key | Sign a particular key |
| -I | Define key identity |
| -n | Principal, the name of the user or host |
| -v +1d | Allow for one day |
The output will look something like:
Signed user key /home/michael/.ssh/id_ed25519-cert.pub: id "michael" serial 0 for ubuntu valid from 2015-12-23T14:03:00 to 2015-12-24T14:04:10
So we see the user key is signed, and a new file is created (id_ed25519-cert.pub). We can query details about this key with the same ssh-keygen utility.
ssh-keygen -L -f ~/.ssh/id_ed25519-cert.pub
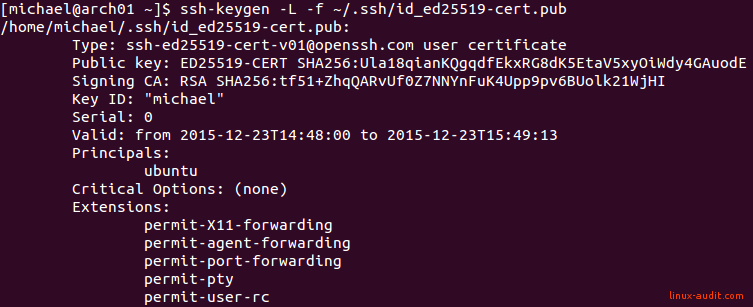
The output will show something like this:

SSH user certificate for temporary access
Note: For demo purposes, we tried using a non-existing username (ubuntu). This is the principle listed above. By providing an incorrect principle, access will be denied. So ensure that you pick the right principle.
Returning the signed key
With the public key signed, share this new file (id_ed25519-cert.pub) with the user, so he or she can use it for logging in.
Testing authentication with temporary access
So now we have signed the key with our CA key and set a validity. Time to log in!
ssh -v support@192.168.1.223
That doesn’t work…
debug1: Next authentication method: publickey
debug1: Offering ED25519-CERT public key: .ssh/id_ed25519-cert.pub
debug1: Authentications that can continue: publickey,password
debug1: Next authentication method: password
Our public key (signed by the CA) was offered, but not accepted as a valid authentication method. SSH continued with the password option, which we don’t have.
To get things working, we have to add the public key to the other end. However, we don’t want to allow the public key to have permanent access. So instead, we add the public key of the certificate authority.
Configuration on server
The first step is to configure the account on the receiving server. In our case the support user.
umask 700
mkdir /home/support/.ssh
touch /home/support/.ssh/authorized_keys
Add then the CA public key to the authorized_keys file.
cert-authority ssh-rsa AAAAB3NzaC1yc2EAAAA<long string>
Ensure that you are copying the public key of the certificate authority. We want to trust only those authentication requests, which are signed by our CA.
Logging in
Now let’s try again and see if it works.

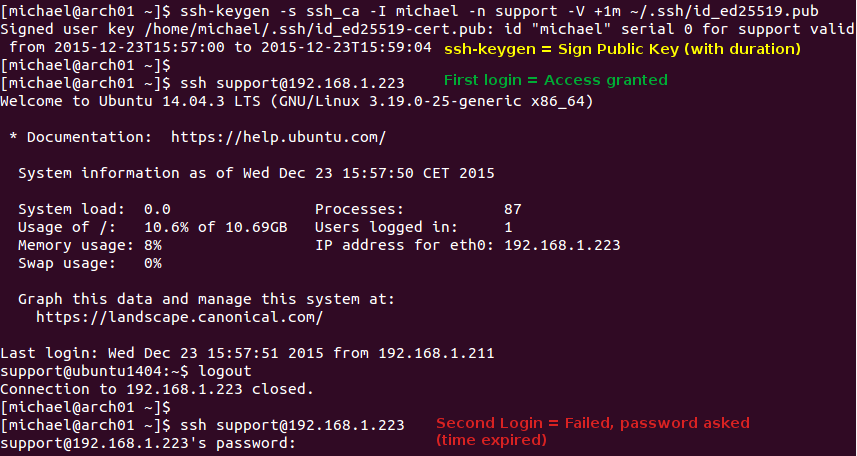
Temporary SSH access granted and later denied
Access granted (and denied)
This time authentication succeeds and we are greeted with a message of the day.
We can also see at the bottom of the screenshot that the second attempt failed. This is because we tried logging in after the end date of the signed certificate.
The related debugging of a successful login:
debug1: Authentications that can continue: publickey,password
debug1: Next authentication method: publickey
debug1: Trying private key: /home/michael/.ssh/id_rsa
debug1: Trying private key: /home/michael/.ssh/id_dsa
debug1: Trying private key: /home/michael/.ssh/id_ecdsa
debug1: Offering ED25519 public key: /home/michael/.ssh/id_ed25519
debug2: we sent a publickey packet, wait for reply
debug1: Authentications that can continue: publickey,password
debug1: Offering ED25519-CERT public key: /home/michael/.ssh/id_ed25519
debug2: we sent a publickey packet, wait for reply
debug1: Server accepts key: pkalg ssh-ed25519-cert-v01@openssh.com blen 862
debug2: input_userauth_pk_ok: fp SHA256:Ula18qianKQgqdfEkxRG8dK5EtaV5xyOiWdy4GAuodE
debug1: Authentication succeeded (publickey).
And the same request for the expired attempt which took place later:
debug1: Next authentication method: publickey
debug1: Trying private key: /home/michael/.ssh/id_rsa
debug1: Trying private key: /home/michael/.ssh/id_dsa
debug1: Trying private key: /home/michael/.ssh/id_ecdsa
debug1: Offering ED25519 public key: /home/michael/.ssh/id_ed25519
debug2: we sent a publickey packet, wait for reply
debug1: Authentications that can continue: publickey,password
debug1: Offering ED25519-CERT public key: /home/michael/.ssh/id_ed25519
debug2: we sent a publickey packet, wait for reply
debug1: Authentications that can continue: publickey,password
debug2: we did not send a packet, disable method
debug1: Next authentication method: password
The server will show (in the last attempt) that the certificate is expired. Great, that proofs it is working like intended.
Dec 23 16:16:56 ubuntu1404 sshd[2087]: error: Certificate invalid: expired
Troubleshooting common errors
When using SSH keys, the smallest things can prevent things from working. As you are working with private and public keys, ensure that you are working with the right key. Also set file permissions tight, to prevent SSH from bailing out.
- Check the server log (e.g. /var/log/auth.log)
- Check file permissions
- Run ssh with -v or -vv
- Check system time
Error: sshd[1381]: error: Certificate invalid: name is not a listed principal
While signing the key, ensure that the principal is correct. This is the -n parameter during the key signing process.
Unprotected private key file
Make sure that file permissions are set correctly. The easiest way to have strict permissions is by defining a umask 077, so files are created with octal permissions 600 and directories with 700.
@@@@@@@@@@@@@@@@@@@@@@@@@@@@@@@@@@@@@@@@@@@@@@@@@@@@@@@@@@@
@ WARNING: UNPROTECTED PRIVATE KEY FILE!                  @
@@@@@@@@@@@@@@@@@@@@@@@@@@@@@@@@@@@@@@@@@@@@@@@@@@@@@@@@@@@
Permissions 0644 for '.ssh/id_ed25519-cert.pub' are too open. It is required that your private key files are NOT accessible by others. This private key will be ignored.
Conclusion
The configuration and options of SSH are very powerful. This gem is not commonly used, but very powerful to restrict access. It might be a great option to provide temporary access during holidays, or when an external party needs access for just one day. In upcoming blog posts we will dive deeper into the other options.
Read the OpenSSH security and hardening guide article for more tips.
Did you learn something from this article or got feedback? Let it know!

