How to solve an expired key (KEYEXPIRED) with apt

Updating expired keys on Debian and Ubuntu

Software updates and package management is easy with systems based on Debian or Ubuntu. Just apt-get update (or apt update) and run an upgrade. But sometimes you may encounter the following situation: a KEYEXPIRED message.

root# apt-get update && apt-get upgrade
Get:1 http://security.ubuntu.com/ubuntu xenial-security InRelease [94.5 kB]
Hit:2 http://nl.archive.ubuntu.com/ubuntu xenial InRelease
Get:3 http://nl.archive.ubuntu.com/ubuntu xenial-updates InRelease [95.7 kB]
Hit:4 http://nl.archive.ubuntu.com/ubuntu xenial-backports InRelease
Hit:5 https://packages.cisofy.com/community/lynis/deb stable InRelease
Get:6 http://nl.archive.ubuntu.com/ubuntu xenial-updates/main amd64 Packages [373 kB]
Ign:7 http://nginx.org/packages/mainline/ubuntu xenial InRelease
Get:8 http://nginx.org/packages/mainline/ubuntu xenial Release [2,309 B]
Get:9 http://nginx.org/packages/mainline/ubuntu xenial Release.gpg [287 B]
Get:10 http://nl.archive.ubuntu.com/ubuntu xenial-updates/main i386 Packages [368 kB]
Get:11 http://nl.archive.ubuntu.com/ubuntu xenial-updates/universe amd64 Packages [319 kB]
Get:12 http://nl.archive.ubuntu.com/ubuntu xenial-updates/universe i386 Packages [316 kB]
Err:9 http://nginx.org/packages/mainline/ubuntu xenial Release.gpg
The following signatures were invalid: KEYEXPIRED 1471427554
Fetched 1,566 kB in 0s (2,003 kB/s)
Reading package lists… Done
W: An error occurred during the signature verification. The repository is not updated and the previous index files will be used. GPG error: http://nginx.org/packages/mainline/ubuntu xenial Release: The following signatures were invalid: KEYEXPIRED 1471427554
W: Failed to fetch http://nginx.org/packages/mainline/ubuntu/dists/xenial/Release.gpg The following signatures were invalid: KEYEXPIRED 1471427554
W: Some index files failed to download. They have been ignored, or old ones used instead.
Reading package lists… Done
Building dependency tree
Reading state information… Done
Calculating upgrade… Done
The following packages will be upgraded:
apparmor libapparmor-perl libapparmor1 python3-distupgrade python3-software-properties software-properties-common ubuntu-release-upgrader-core
7 upgraded, 0 newly installed, 0 to remove and 0 not upgraded.
Need to get 0 B/672 kB of archives.
After this operation, 5,120 B of additional disk space will be used.
Do you want to continue? [Y/n] y

The KEYEXPIRED shows that validation failed on the related repository signature. This is a good thing, to warn us that we should be checking the repository. With an expired key, the solution is simple: we need to download an updated key. Apparently it is for the nginx repository.

Step 1: Run apt-key

Using the apt-key utility we can display all the known keys.

apt-key list

In our case, we see the nginx key is expired a few days ago:

pub 2048R/7BD9BF62 2011-08-19 [expired: 2016-08-17]
uid nginx signing key <signing-key@nginx.com>

Two items are highlighted in this example. The first one is the short version of the key. The second one is showing that the key is expired (including the date). This key was valid for almost 5 years.

To quickly find the expired keys, search for “expired:”:

apt-key list | grep “expired:”

Step 2: Update the key

We can now use the key gathered in step 1 to update it:

apt-key adv --keyserver keys.gnupg.net --recv-keys [KEY]

The output might look like this:
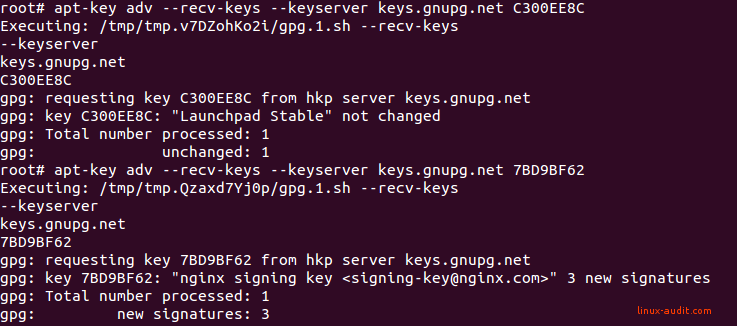
Screenshot of apt to renew an expired APT key

The key is renewed, after choosing the right one (otherwise no change is made)

On purpose we selected an incorrect key, which was also related to nginx:

/etc/apt/trusted.gpg.d/nginx-development.gpg
——————————————–
pub 1024R/C300EE8C 2010-07-21
uid Launchpad Stable

As you can see in the output above, nothing happens when you select the wrong key.

Step 3: Update

After renewing the expired key you can run apt update again and install any available upgrades.

apt update && apt upgrade

Happy upgrading!

One more thing...

Keep learning

So you are interested in Linux security? Join the Linux Security Expert training program, a practical and lab-based training ground. For those who want to become (or stay) a Linux security expert.

See training package


Lynis Enterprise screenshot to help with system hardeningSecurity scanning with Lynis and Lynis Enterprise

Run automated security scans and increase your defenses. Lynis is an open source security tool to perform in-depth audits. It helps with system hardening, vulnerability discovery, and compliance.


Download

41 comments

  • RuslanRuslan

    You a little misteken. Command that update key must look like this:

    apt-key adv –keyserver keys.gnupg.net –recv-keys [KEY]

    Reply
  • Eddie DunnEddie Dunn

    Thanks for the guide; it solved my problem.

    However, the line “apt-key adv –keyserver keys.gnupg.net –recv-keys [KEY]” is broken, since the double dashes before keyserver and recv-keys are replaced by “–”.

    Reply
    • Thanks, I’ve changed it to a code block. WordPress and the use of dashes/minus signs gets messed up easily.

      Reply
  • GeoJulienGeoJulien

    Thanks for your help.
    I’ve been facing a trouble where the keyserver is unreachable and I’m not behind a proxy. I’ve found the solution: sudo apt-key adv –keyserver hkp://keyserver.ubuntu.com:80 –recv 7F0CEB10

    Reply
    • zhongkangzhongkang

      thanks for your advice, it’s working for me

      Reply
  • Carlos AlvarezCarlos Alvarez

    Many thanks for your article. It solved my expired key problem. !!!
    Congratulations from Santiago, Chile.

    Reply
  • prcekprcek

    Little addon:

    apt-key list | grep -A 1 expired

    will show expired keys and its next line with uid for better view.

    Reply
  • Peter KandemalmPeter Kandemalm

    Great! This solved my problem
    Thanks!!

    Reply
  • MikeMike

    I don’t get it. What is aktualy the in that update command? Tried everything and I get always failed, because that’s not correct key identifier.

    For example, I have:

    pub 1024D/1A77B3E9 2005-10-29 [wygasł: 2011-01-22]

    So how my “sudo apt-key adv –keyserver keys.gnupg.net –recv-keys [KEY]” command should look like?

    Reply
    • Hi Mike. Typically you use the part after the slash (1A77..). But this only works if you (or the key owner) uploaded it before. Does that makes sense?

      Reply
  • ConnyConny

    Hi Mike,
    this is what I get when I asked for expired:

    Warning: apt-key output should not be parsed (stdout is not a terminal)

    And that’s all – although there is an expired key …

    I’m using Ubuntu 17.04

    Reply
  • NahomiNahomi

    Thanks!

    Reply
  • AllenAllen

    could someone dumb this way down. Sorry but i have no idea what to do. I really shouldn’t be running linux when i know nothing about computers but my brother set this up and i’m stuck. Please help.

    Reply
  • tt

    “`

    apt-key list |awk ‘/expired/{ print $2 }’ |while read k; do apt-key adv –keyserver keys.gnupg.net –recv-keys ${k#*/}; done

    “`

    Reply
    • bswbsw

      KEY=`(LC_ALL=C apt-key list | grep expired | gawk ‘BEGIN { FS=” ” } { print substr($2, length($2)-7, 8) }’ | xargs)`; apt-key adv –keyserver keys.gnupg.net –recv-keys $KEY

      Reply
  • Sujan barmanSujan barman

    Thank you so much sir,
    This article was really very helpful to me.

    Reply
  • mrv90mrv90

    Dear Michael! Thanks for your great post.
    One little comment .. i just struggling on “extract” expired key, using step 1, and suddenly, i remembered the key i saw, when i trying to update! (e.g: apt-get update)

    Best regard.

    Reply
  • AndruAndru

    hello help me please

    apt-key list | grep -A 1 expired
    Warning: apt-key output should not be parsed (stdout is not a terminal)
    pub rsa4096 2012-03-05 [SC] [expired: 2018-02-02]
    44C6 513A 8E4F B3D3 0875 F758 ED44 4FF0 7D8D 0BF6
    uid [ expired] Kali Linux Repository

    What is key for this command
    apt-key adv –keyserver keys.gnupg.net –recv-keys [KEY]

    Reply
  • USNUSN

    Keep your keys updated. Run the following one liner:

    apt-key list |grep “expired” | awk ‘{print $2}’ |sed ‘s/\// /g’ |awk ‘{print $2}’ |xargs apt-key adv –keyserver keys.gnupg.net –recv-keys

    Put this in your crontab and you shouldn’t have to worry about expired keys.

    Reply
    • Thanks, seems like a good tip for those who experience it now and then :)

      Reply
    • pavlospavlos

      you could combine the first grep in the awk like, apt-key list | awk ‘/expired/{ print $2 }’

      maybe you could explain the sed part …

      Reply
  • BlerimJBlerimJ

    Thank you. Very clear.

    Reply
  • Brian LevinsenBrian Levinsen

    Nice one, thanks.
    I had a bunch of them to update so wrote a short one liner.

    for i in `apt-key list | grep “expired:” | awk ‘{print $2}’ | awk -F “/” ‘{print $2}’`; do sudo apt-key adv –keyserver keys.gnupg.net –recv-keys $i; done

    Reply
  • KanKan

    Can somebody help me please ? The apt-get update continue ending with error. I’m on Debian Squeeze.

    root@xxx:apt-key list |grep “expired” | awk ‘{print $2}’ |sed ‘s/\// /g’ |awk ‘{print $2}’ |xargs apt-key adv –keyserver keys.gnupg.net –recv-keys
    Executing: gpg –ignore-time-conflict –no-options –no-default-keyring –secret-keyring /etc/apt/secring.gpg –trustdb-name /etc/apt/trustdb.gpg –keyring /etc/apt/trusted.gpg –primary-keyring /etc/apt/trusted.gpg –keyserver keys.gnupg.net –recv-keys F42584E6 6D849617 B98321F9
    gpg: requesting key F42584E6 from hkp server keys.gnupg.net
    gpg: requesting key 6D849617 from hkp server keys.gnupg.net
    gpg: requesting key B98321F9 from hkp server keys.gnupg.net
    gpg: key F42584E6: “Lenny Stable Release Key ” not changed
    gpg: key 6D849617: “Debian-Volatile Archive Automatic Signing Key (5.0/lenny)” not changed
    gpg: key B98321F9: “Squeeze Stable Release Key ” not changed
    gpg: Total number processed: 3
    gpg: unchanged: 3

    root@xxx:/etc/apt# apt-get update
    Hit http://download.proxmox.com squeeze Release.gpg
    Ign http://download.proxmox.com/debian/ squeeze/pve Translation-en
    Ign http://download.proxmox.com/debian/ squeeze/pve Translation-en_US
    Get:1 http://archive.debian.org squeeze Release.gpg [1,655 B]
    Ign http://archive.debian.org/debian/ squeeze/contrib Translation-en
    Ign http://archive.debian.org/debian/ squeeze/contrib Translation-en_US
    Ign http://archive.debian.org/debian/ squeeze/main Translation-en
    Ign http://archive.debian.org/debian/ squeeze/main Translation-en_US
    Hit http://download.proxmox.com squeeze Release
    Get:2 http://archive.debian.org squeeze Release [96.0 kB]
    Ign http://archive.debian.org squeeze Release
    Ign http://download.proxmox.com squeeze/pve amd64 Packages
    Ign http://archive.debian.org squeeze/main amd64 Packages/DiffIndex
    Hit http://download.proxmox.com squeeze/pve amd64 Packages
    Ign http://archive.debian.org squeeze/contrib amd64 Packages/DiffIndex
    Hit http://archive.debian.org squeeze/main amd64 Packages
    Hit http://archive.debian.org squeeze/contrib amd64 Packages
    Fetched 1,656 B in 0s (15.0 kB/s)
    Reading package lists… Done
    W: GPG error: http://archive.debian.org squeeze Release: The following signatures were invalid: KEYEXPIRED 1520281423 KEYEXPIRED 1501892461

    Reply
  • ChrisChris

    same Problem for me.
    pls help

    Reply
  • Linux HackerLinux Hacker

    What if an update key is actually not available (repository maintainer has not updated the keys to sign the repository)? How can then I FORCE apt to continue even without having an updated key? Seems like none of “allow insecure repositories”, “allow downgrade to insecure repositories”, and [trusted=yes] in sources.list actually work – it still refuses to download the updated package list from that repository. How to FORCE it to ignore all safety, disable any and all security and update the repository anyway?
    Don’t tell me that one is hardcoded in apt source code and impossible to bypass!?

    Reply
  • Darlene GrahamDarlene Graham

    This what mine looks like. What can I do to fix this please help me.

    (trusty)darlenegraham@localhost:~$ sudo apt-key adv-keyserver keys.gnupg.net-recv-key 75E52366
    [sudo] password for darlenegraham:
    Executing: gpg –ignore-time-conflict –no-options –no-default-keyring –homedir /tmp/tmp.TF2m8sWXjL –no-auto-check-trustdb –trust-model always –keyring /etc/apt/trusted.gpg –primary-keyring /etc/apt/trusted.gpg keys.gnupg.net-recv-key 75E52366
    usage: gpg [options] [filename]

    Reply
  • automataautomata

    This will solve the problem

    apt-key adv –keyserver hkp://keys.gnupg.net –recv-keys 7D8D0BF6

    Reply
    • Shay Ben-SassonShay Ben-Sasson

      Just for completeness (concatenated a few comments):
      apt-key list |grep “expired” | awk ‘{print $2}’ |sed ‘s/\// /g’ |awk ‘{print $2}’ |xargs sudo apt-key adv –keyserver hkp://keyserver.ubuntu.com:80 –recv-keys

      NOTE: html might screw some chars such as: “,’,– (double minus)
      be sure to replace them

      Good luck

      Reply
  • Shivdas KanadeShivdas Kanade

    I was install MySQL 8 version, got key expired error. I was searching for solution. your article helped to renew expired key.

    Reply
  • Tobias FischerTobias Fischer

    Hi,
    if you have more tha x keys …

    apt-key list | grep “expired” | awk ‘{print $2;}’ | awk -F “/” ‘{print $2;}’ | while read a; do echo $a; apt-key adv –keyserver keys.gnupg.net –recv-keys $a; done

    THX

    Reply
  • Raja Gandharaw (GRajaMca)Raja Gandharaw (GRajaMca)

    Please use the below command, it should resolve your problems.

    apt-key list | awk ‘/expired/’ RS=”nn” | awk ‘NR==2’| awk ‘{ gsub(/^[ t]+|[ t]+$/, “”); print $9$10}’ | while read a; do echo $a; apt-key adv –recv-key $a; done

    Reply
  • KotKot

    Or you can use this command (eliminate problem Warning: apt-key output should not be parsed):

    apt-key list > keys.tmp;cat keys.tmp |grep -v ‘pub\|uid\|gpg\|–\|sub’|awk ‘{print $9$10}’|while read “L”;do [ -n “$L” ] && sudo apt-key adv –keyserver keys.gnupg.net –recv-keys “$L”;done;rm keys.tmp

    After copy please change ” and ‘ because this webform changes them to incorrect forms.

    Reply

Leave a Reply

Your email address will not be published. Required fields are marked *

This site uses Akismet to reduce spam. Learn how your comment data is processed.