Granting temporary access to your servers (using signed SSH keys)

In need of support from a colleague or vendor, but don’t want to give them permanent access? SSH has an option to allow temporary access! Next time you need to provide temporary access for an hour or day, use this great option.

Configuration

We have two machines for this purpose. One is a system running Arch Linux, the client system. The other one is a server, running Ubuntu Linux. For temporary support, we have created a functional account support on the Ubuntu server. In the examples along the road, user michael is the one providing the support. So we are going to give him access to the support account. Temporarily!

Suggestion: On each of the machines running commands, set your umask correctly (e.g. umask 077). Otherwise, files will be created with loose permissions, and result in errors later on.

Creating a Certificate Authority

The first step is to create a CA key. This key will be used to sign the public key of the user providing the support. Ideally, this key creation should be done on a secure system.

ssh-keygen -f ssh_ca

This should result in two files:

  • ssh_ca (private key)
  • ssh_ca.pub (public key)

Want to have a more secure key? Use the -b parameter and increase it to 4096 bits.

The signing process

After creating the CA key pair, it is time to sign the user public key with the CA key.

Create an SSH key pair for users

If you don’t have an SSH key pair for your user account, create one first.

ssh-keygen -t ed25519 -C "michael from linux-audit.com"

Signing the user key

Now we need to copy the public key of the user, to our system which holds the CA key. This way we can sign the public key. Use SCP or e-mail to transfer it to the machine. For our demo purposes, we will perform all the actions on the same system. Don’t do this in production and keep keys properly separated.

Time to do the signing. In this example, we use an Ed25519 public key. Replace it with id_rsa.pub if you used a RSA key.

ssh-keygen -s ssh_ca -I michael -n support -V +1d ~/.ssh/id_ed25519.pub

Parameters

  • -s key = signing
  • -I = key identity
  • -n principal, the name of the user or host
  • -v +1d = allow for one day

The output will look something like:

Signed user key /home/michael/.ssh/id_ed25519-cert.pub: id “michael” serial 0 for ubuntu valid from 2015-12-23T14:03:00 to 2015-12-24T14:04:10

So we see the user key is signed, and a new file is created (id_ed25519-cert.pub). We can query details about this key with the same ssh-keygen utility.

ssh-keygen -L -f ~/.ssh/id_ed25519-cert.pub

The output will show something like this:
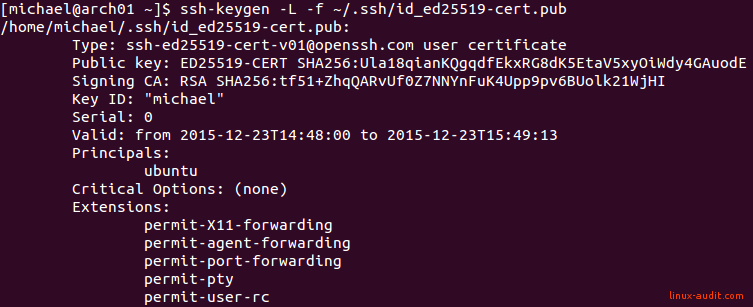
Screenshot of a SSH user certificate to allow temporary access

SSH user certificate for temporary access

Note: For demo purposes, we tried using a non-existing username (ubuntu). This is the principle listed above. By providing an incorrect principle, access will be denied. So ensure that you pick the right principle.

Returning the signed key

With the public key signed, share this new file (id_ed25519-cert.pub) with the user, so he or she can use it for logging in.

Testing authentication with temporary access

So now we have signed the key with our CA key and set a validity. Time to log in!

ssh -v support@192.168.1.223

That doesn’t work…

debug1: Next authentication method: publickey
debug1: Offering ED25519-CERT public key: .ssh/id_ed25519-cert.pub
debug1: Authentications that can continue: publickey,password
debug1: Next authentication method: password

Our public key (signed by the CA) was offered, but not accepted as a valid authentication method. SSH continued with the password option, which we don’t have.

To get things working, we have to add the public key to the other end. However, we don’t want to allow the public key to have permanent access. So instead, we add the public key of the certificate authority.

Configuration on server

The first step is to configure the account on the receiving server. In our case the support user.

umask 700
mkdir /home/support/.ssh
touch /home/support/.ssh/authorized_keys

Add then the CA public key to the authorized_keys file.

cert-authority ssh-rsa AAAAB3NzaC1yc2EAAAA<long string>

Ensure that you are copying the public key of the certificate authority. We want to trust only those authentication requests, which are signed by our CA.

Logging in

Now let’s try again and see if it works.
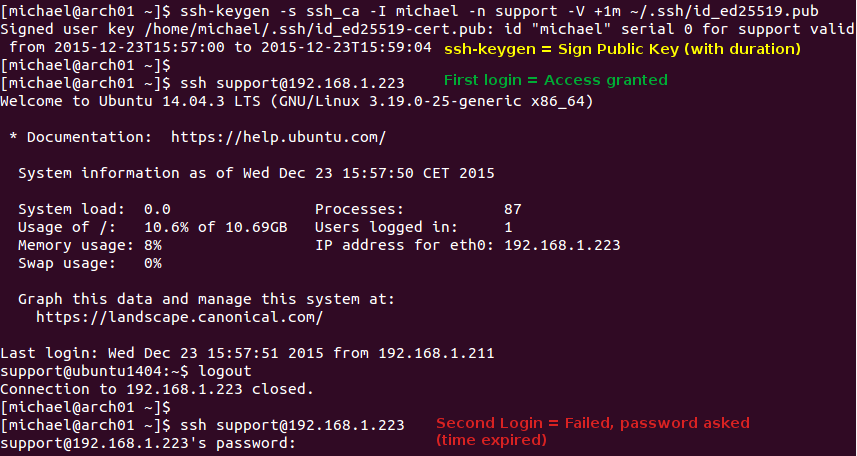
Screenshot showing temporary an allow and deny of SSH request

Temporary SSH access granted and later denied

Access granted (and denied)

This time authentication succeeds and we are greeted with a message of the day.

We can also see at the bottom of the screenshot that the second attempt failed. This is because we tried logging in after the end date of the signed certificate.

The related debugging of a successful login:

debug1: Authentications that can continue: publickey,password
debug1: Next authentication method: publickey
debug1: Trying private key: /home/michael/.ssh/id_rsa
debug1: Trying private key: /home/michael/.ssh/id_dsa
debug1: Trying private key: /home/michael/.ssh/id_ecdsa
debug1: Offering ED25519 public key: /home/michael/.ssh/id_ed25519
debug2: we sent a publickey packet, wait for reply
debug1: Authentications that can continue: publickey,password
debug1: Offering ED25519-CERT public key: /home/michael/.ssh/id_ed25519
debug2: we sent a publickey packet, wait for reply
debug1: Server accepts key: pkalg ssh-ed25519-cert-v01@openssh.com blen 862debug2: input_userauth_pk_ok: fp SHA256:Ula18qianKQgqdfEkxRG8dK5EtaV5xyOiWdy4GAuodEdebug1: Authentication succeeded (publickey).

And the same request for the expired attempt which took place later:

debug1: Next authentication method: publickey
debug1: Trying private key: /home/michael/.ssh/id_rsa
debug1: Trying private key: /home/michael/.ssh/id_dsa
debug1: Trying private key: /home/michael/.ssh/id_ecdsa
debug1: Offering ED25519 public key: /home/michael/.ssh/id_ed25519
debug2: we sent a publickey packet, wait for reply
debug1: Authentications that can continue: publickey,password
debug1: Offering ED25519-CERT public key: /home/michael/.ssh/id_ed25519
debug2: we sent a publickey packet, wait for reply
debug1: Authentications that can continue: publickey,password
debug2: we did not send a packet, disable method
debug1: Next authentication method: password

The server will show (in the last attempt) that the certificate is expired. Great, that proofs it is working like intended.

Dec 23 16:16:56 ubuntu1404 sshd[2087]: error: Certificate invalid: expired

Troubleshooting common errors

When using SSH keys, the smallest things can prevent things from working. As you are working with private and public keys, ensure that you are working with the right key. Also set file permissions tight, to prevent SSH from bailing out.

  • Check the server log (e.g. /var/log/auth.log)
  • Check file permissions
  • Run ssh with -v or -vv
  • Check system time

sshd[1381]: error: Certificate invalid: name is not a listed principal

While signing the key, ensure that the principal is correct. This is the -n parameter during the key signing process.

Unprotected private key file

Make sure that file permissions are set correctly. The easiest way to have strict permissions is by defining a umask 077, so files are created with octal permissions 600 and directories with 700.

@@@@@@@@@@@@@@@@@@@@@@@@@@@@@@@@@@@@@@@@@@@@@@@@@@@@@@@@@@@
@ WARNING: UNPROTECTED PRIVATE KEY FILE!                  @
@@@@@@@@@@@@@@@@@@@@@@@@@@@@@@@@@@@@@@@@@@@@@@@@@@@@@@@@@@@
Permissions 0644 for '.ssh/id_ed25519-cert.pub' are too open. It is required that your private key files are NOT accessible by others. This private key will be ignored.

Conclusion

The configuration and options of SSH are very powerful. This gem is not commonly used, but very powerful to restrict access. It might be a great option to provide temporary access during holidays, or when an external party needs access for just one day. In upcoming blog posts we will dive deeper into the other options.

Read the OpenSSH security and hardening guide article for more tips.


Did you learn something from this article? Great! Be part of the community and share it with others. Use the comments if you like to share something or have questions.

One more thing...

Keep learning

So you are interested in Linux security? Join the Linux Security Expert training program, a practical and lab-based training ground. For those who want to become (or stay) a Linux security expert.

See training package


Lynis Enterprise screenshot to help with system hardeningSecurity scanning with Lynis and Lynis Enterprise

Run automated security scans and increase your defenses. Lynis is an open source security tool to perform in-depth audits. It helps with system hardening, vulnerability discovery, and compliance.


Download

7 comments

  • Gabor KissGabor Kiss

    If a user logged in with its temporary key what will prevents him from creating a ~/.ssh/authorized_keys file with a permanent one?

    Reply
  • Radiya DhavalRadiya Dhaval

    Hi Micheal,
    I have created self signed certificate for OpenSSH as per above article but when i am trying to connect with server through SSH, it every time ask me the password authentication. You can see this from below log:

    dhaval@AHMCPU1983:~$ ssh -v -2 -i ~/.ssh/id_ed25519-cert.pub root@10.99.18.42
    OpenSSH_6.6.1, OpenSSL 1.0.1f 6 Jan 2014
    debug1: Reading configuration data /etc/ssh/ssh_config
    debug1: /etc/ssh/ssh_config line 19: Applying options for *
    debug1: Connecting to 10.99.18.42 [10.99.18.42] port 22.
    debug1: Connection established.
    debug1: ssh_rsa_verify: signature correct
    debug1: identity file /home/dhaval/.ssh/id_ed25519-cert.pub type 8
    debug1: identity file /home/dhaval/.ssh/id_ed25519-cert.pub-cert type -1
    debug1: Enabling compatibility mode for protocol 2.0
    debug1: Local version string SSH-2.0-OpenSSH_6.6.1p1 Ubuntu-2ubuntu2.8
    debug1: Remote protocol version 2.0, remote software version OpenSSH_5.9
    debug1: match: OpenSSH_5.9 pat OpenSSH_5* compat 0x0c000000
    debug1: SSH2_MSG_KEXINIT sent
    debug1: SSH2_MSG_KEXINIT received
    debug1: kex: server->client aes128-ctr hmac-md5 none
    debug1: kex: client->server aes128-ctr hmac-md5 none
    debug1: sending SSH2_MSG_KEX_ECDH_INIT
    debug1: expecting SSH2_MSG_KEX_ECDH_REPLY
    debug1: Server host key: ECDSA 1e:47:e6:35:c1:2e:3f:94:4e:56:2e:fc:4c:cd:9f:6c
    debug1: Host ‘10.99.18.42’ is known and matches the ECDSA host key.
    debug1: Found key in /home/dhaval/.ssh/known_hosts:13
    debug1: ssh_ecdsa_verify: signature correct
    debug1: SSH2_MSG_NEWKEYS sent
    debug1: expecting SSH2_MSG_NEWKEYS
    debug1: SSH2_MSG_NEWKEYS received
    debug1: SSH2_MSG_SERVICE_REQUEST sent
    debug1: SSH2_MSG_SERVICE_ACCEPT received
    debug1: Authentications that can continue: publickey,password,keyboard-interactive
    debug1: Next authentication method: publickey
    debug1: Offering RSA public key: dhaval@AHMCPU1983
    debug1: Authentications that can continue: publickey,password,keyboard-interactive
    debug1: Offering ED25519-CERT public key: /home/dhaval/.ssh/id_ed25519-cert.pub
    debug1: Authentications that can continue: publickey,password,keyboard-interactive
    debug1: Next authentication method: keyboard-interactive
    debug1: Authentications that can continue: publickey,password,keyboard-interactive
    debug1: Next authentication method: password
    root@10.99.18.42‘s password:
    debug1: Authentication succeeded (password).
    Authenticated to 10.99.18.42 ([10.99.18.42]:22).
    debug1: channel 0: new [client-session]
    debug1: Requesting no-more-sessions@openssh.com
    debug1: Entering interactive session.
    debug1: Remote: Ignored authorized keys: bad ownership or modes for file /home/root/.ssh/authorized_keys
    debug1: Sending environment.
    debug1: Sending env LANG = en_IN

    So, what is the solution to disable password based authentication in OpenSSH. My Host pc ssh version is OpenSSH6.5p1 and server ssh version is OpenSSH5.9p1. Please reply.

    Reply
    • You did it almost correctly. One of the last lines says “Ignored authorized keys: bad ownership or modes for file /home/root/.ssh/authorized_keys”. This means you need to restrict access to this directory (.ssh) and the file: chmod 700 .ssh && chmod 640 .ssh/authorized_keys.

      Did that work?

      Reply
  • Yves GauvreauYves Gauvreau

    Michael,

    I like this idea of temp keys quite a bit, so much so that I would use it on a regular basis for every user. That way, all users would have to specify their key explicitly almost each time instead of having their app remember it for them (especially non Linux users).

    I don’t want to sound to critical but all this is pretty straight forward on an homogeneous system (ie. Linux) but when you add Windows, Macs, Androids and whatever into the picture, it complicate things a little and I just want to understand.

    For example, the command “ssh-keygen -s ssh_ca -I michael -n support -V +1d ~/.ssh/id_ed25519.pub” isn’t likely to work as is. The signature file “ssh_ca” and command itself, implies that you are root and in the same directory as this file is and if so then “~/.ssh/id_ed25519.pub” implies this key and the signed key are (will be) in /root/.ssh/ at least on my server (OpenSuSE Leap 42.2).

    If I understand correctly and whichever way they get there, each user (account on server) as an authorized_keys file which contains the ssh_ca.pub key and a (ssh_ca) signed key in is (her) own .ssh dir. Lets assume the private key is on the device used to access the server from, do they need the signed key as well?

    For my own case, that makes things a bit complicated since I need access from all these device in order to configure everything needed for them. I’ll probably use a portable key on a USB stick and use an account just for that key, not root for sure.

    The main client program that will be used to access my server from a Windows PC is WinScp and it doesn’t like openssh keys, I don’t know yet if signed keys are usable and I would also like to chroot my users as well.

    The Android app that will most likely be used is some type of file manager with key base SFTP access and of course chroot dir for them as well.

    Nothing was mentioned about the required configuration for all this to work properly in sshd_config, anything special needed? And if I may, any suggestions on key authentication + chroot as well? Lastly, what about the server host key, doen’t it have to be signed as well?

    Thanks for your article, very nice of you to share all this,
    Yves

    Reply
    • Hi Yves. Yes, you only create the ssh_ca once, which is used to sign the other keys. You need key-based authentication, so any tools that don’t have support for that, can not be used. Typically you would use this to give someone temporarily access via SSH. If time allows, this article may be expanded with more examples. No changes are needed to the configuration. As you can see, this was tested on a recent Linux distribution, as Arch Linux was used.

      Reply
  • JoeyJoey

    I keep getting prompted for password no matter what i do

    user1@CDYVRCMLT007 ~/.ssh $ ssh -v -i ssh_ca-cert.pub developer@server1
    OpenSSH_7.4p1, LibreSSL 2.5.0
    debug1: Reading configuration data /Users/anthony.delarosa/.ssh/config
    debug1: Reading configuration data /etc/ssh/ssh_config
    debug1: Connecting to aws-mtl-w1-php-upgrade.cloud.cd.local [10.100.115.102] port 22.
    debug1: Connection established.
    debug1: identity file ssh_ca-cert.pub type 5
    debug1: key_load_public: No such file or directory
    debug1: identity file ssh_ca-cert.pub-cert type -1
    debug1: Enabling compatibility mode for protocol 2.0
    debug1: Local version string SSH-2.0-OpenSSH_7.4
    debug1: Remote protocol version 2.0, remote software version OpenSSH_7.2p2 Ubuntu-4ubuntu2.6
    debug1: match: OpenSSH_7.2p2 Ubuntu-4ubuntu2.6 pat OpenSSH* compat 0x04000000
    debug1: Authenticating to server1:22 as ‘developer’
    debug1: SSH2_MSG_KEXINIT sent
    debug1: SSH2_MSG_KEXINIT received
    debug1: kex: algorithm: curve25519-sha256@libssh.org
    debug1: kex: host key algorithm: ecdsa-sha2-nistp256
    debug1: kex: server->client cipher: chacha20-poly1305@openssh.com MAC: compression: none
    debug1: kex: client->server cipher: chacha20-poly1305@openssh.com MAC: compression: none
    debug1: expecting SSH2_MSG_KEX_ECDH_REPLY
    debug1: Server host key: ecdsa-sha2-nistp256 SHA256:bdJD77zXAoDU9ElvOuYhi+yCwHsN7I7U2VjywjcUDl4
    debug1: Host ‘aws-mtl-w1-php-upgrade.cloud.cd.local’ is known and matches the ECDSA host key.
    debug1: Found key in /Users/anthony.delarosa/.ssh/known_hosts:116
    debug1: rekey after 134217728 blocks
    debug1: SSH2_MSG_NEWKEYS sent
    debug1: expecting SSH2_MSG_NEWKEYS
    debug1: SSH2_MSG_NEWKEYS received
    debug1: rekey after 134217728 blocks
    debug1: SSH2_MSG_EXT_INFO received
    debug1: kex_input_ext_info: server-sig-algs=
    debug1: SSH2_MSG_SERVICE_ACCEPT received
    debug1: Authentications that can continue: publickey,password
    debug1: Next authentication method: publickey
    debug1: Offering RSA-CERT public key: ssh_ca-cert.pub
    debug1: Authentications that can continue: publickey,password
    debug1: Next authentication method: password
    developer@aws-mtl-w1-php-upgrade.cloud.cd.local‘s password:

    I added the cert-authority with the SSH pub key but still nothing, I’ve restarted the service and nothing.

    I appreciate the tutorial but it’s not very clear, a lot of things are confusing. I would be nice if it had been written with clear instructions telling you where those commands are to be ran. Also the /etc/ssh/sshd_config part is missing and I’m sure you have to allow TrustedUserCAKeys. I can’t seem to get it to work no matter what I do and I feel I already tried everything I can and spent too much time on something that could’ve been avoided had the instructions been more clear.

    Reply

Leave a Reply

Your email address will not be published. Required fields are marked *

This site uses Akismet to reduce spam. Learn how your comment data is processed.