Block IP addresses in Linux with iptables

Blocking IP addresses and subnets with ipset

Most system administrators will already be familiar with iptables. It is around for quite a while and is enabled by default within the Linux kernel. We can use iptables to block one, multiple IP addresses, or even full networks. This may come in handy when you get repeating port scans or see failed login attempts in your log files. Time to get started and block some IP addresses!

Check existing iptables configuration

The first step is to validate existing iptables rules. We will use an empty ruleset for test purposes.

iptables -L

Output of iptables rules

Manually blocking a single IP address

The first option to permanently block an IP address is by creating a rule in the INPUT chain. This way traffic is no longer allowed from that particular IP address.

iptables -I INPUT -s 192.168.1.100 -j DROP

Although this option works great, it might not scale very well. You might even get a very long list of IP addresses to block after a while. Let’s have a look at ipset.

Using blacklists with iptables and ipset

Another option is creating a blacklist. This way we can add multiple systems we no longer want to connect to our systems.

Install ipset utility

Most Linux systems do not have the ipset utility installed by default. So first install that toolkit.

CentOS
yum install ipset

You may need to install the epel-release package first.

Debian and Ubuntu

apt-get install ipset

Creating a blacklist

With the newly installed ipset utility we create a new list to block IP addresses. We name it blacklist to show clearly its purpose.

# Create blacklist with ipset utility (once)
ipset create blacklist hash:ip hashsize 4096

Note: if you want to block based on networks, use hash:net.

After the blacklist is created, we can use the set in iptables. It is related to the –match-set option.

# Set up iptables rules. Match with blacklist and drop traffic
iptables -I INPUT -m set --match-set blacklist src -j DROP
iptables -I FORWARD -m set --match-set blacklist src -j DROP

Iptables with blacklists to block some IP addresses

These commands will add the blacklist (or set) to the INPUT and FORWARD chains. As this is a blacklist, the related policy is to drop traffic. No output will be displayed when entering the commands.

Create iptables blacklist for blocking IP addresses

Adding IP addresses to block

Next step is adding actual IP address to the list:

# Add a specific IP address to your newly created blacklist
ipset add blacklist 192.168.1.100

Show details

To confirm the blacklist contains the IP address, use the ipset list command.
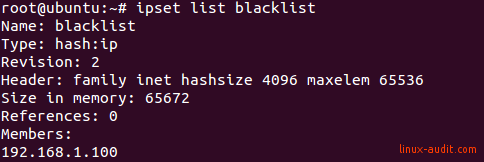
Output of ipset command showing blacklist

In this screenshot, we can see the IP address is listed as a member of the set. Now traffic should be blocked.

Test rules and activate rules on reboot

When setting up a blacklist like this, always test it. You want to be sure that the blacklist is enforced in your specific configuration. Also, make sure it still works after a reboot of the system.

To save and restore iptables rules, use the package iptables-persistent. As the name implies, this makes the iptables rules persistent across reboots.

apt install iptables-persistent

To also store ipset rules, create a small systemd service file: /etc/systemd/system/save-ipset-rules.service

# ipset save/restore script (see https://linux-audit.com/blocking-ip-addresses-in-linux-with-iptables/)

[Unit]
Description=ipset persistent rule service
Before=netfilter-persistent.service
ConditionFileNotEmpty=/etc/iptables/ipset

[Service]
Type=oneshot
RemainAfterExit=yes
ExecStart=/sbin/ipset -exist -file /etc/iptables/ipset restore
ExecStop=/sbin/ipset -file /etc/iptables/ipset save

[Install]
WantedBy=multi-user.target

This script helps to save and restore the ipset rules. You may need to create the /etc/iptables/ipset file.

/sbin/ipset -file /etc/iptables/ipset save

Combining ipset and IPv6

If you want to use IPv6 addresses, create the related database with the ‘inet6’ family.

ipset create blacklist6 hash:net hashsize 4096 family inet6

Then create the ip6tables rule:

ip6tables -I INPUT -m set --match-set blacklist6 src -j DROP

Happy blocking!

One more thing...

Keep learning

So you are interested in Linux security? Join the Linux Security Expert training program, a practical and lab-based training ground. For those who want to become (or stay) a Linux security expert.

See training package


Lynis Enterprise screenshot to help with system hardeningSecurity scanning with Lynis and Lynis Enterprise

Run automated security scans and increase your defenses. Lynis is an open source security tool to perform in-depth audits. It helps with system hardening, vulnerability discovery, and compliance.


Download

30 comments

  • TechTech

    Thank you that worked out fantastic.

    Reply
    • Shivdas KanadeShivdas Kanade

      We should always block external traffic. Allow only required IP with port. IPTABLES is good firewall to block external traffic.

      Reply
  • Stanislav PanayotovStanislav Panayotov

    I’m using this heavy duty bash script as root for some like 15 minutes:

    curl -s https://www.iblocklist.com/lists.php
    | grep -A 2 Bluetack
    | sed -n “s/.*value='(http:.*)’.*/1/p”
    | xargs wget -O –
    | gunzip
    | egrep -v ‘^#’ > blacklist
    grep -Eo ‘[0-9]{1,3}.[0-9]{1,3}.[0-9]{1,3}.[0-9]{1,3}’ blacklist > blacklist-ip
    grep -Eo ‘[0-9]{1,3}.[0-9]{1,3}.[0-9]{1,3}.[0-9]{1,3}[-][0-9]{1,3}.[0-9]{1,3}.[0-9]{1,3}.[0-9]{1,3}’ blacklist > blacklist-ip-range
    sed -i -E “s/[-][0-9]{1,3}.[0-9]{1,3}.[0-9]{1,3}.///” blacklist-ip-range

    sort blacklist-ip | uniq -u > blacklist-ip-sorted
    sort blacklist-ip-range | uniq -u > blacklist-ip-range-sorted
    while read IPADDR
    do
    route add $IPADDR gw 127.0.0.1 lo &
    done < blacklist-ip-range-sorted

    while read IPADDR
    do
    route add $IPADDR gw 127.0.0.1 lo &
    done < blacklist-ip-sorted

    rm blacklist-ip
    rm blacklist-ip-sorted
    rm blacklist-ip-range
    rm blacklist-ip-range-sorted

    Reply
    • Thanks for sharing. While this is another option, it might be less efficient than dropping traffic directly.

      Reply
  • tonytony

    thanks for this guide however in centos 6 these steps do not survive an iptables restart and there is no package iptables-persistent.

    Reply
  • JohnJohn

    AND how do i unblock/deleted IP?????????

    Reply
  • Abdulhamid MaizuwaAbdulhamid Maizuwa

    i want to create a blacklist but kernal is not allowing! how can i go about this?

    Reply
  • Kenny HendrickKenny Hendrick

    Hey Michael,

    Thanks for sharing this information to help us all block amazon (‘;-)
    But can you tell me if there’s an easier way of converting a long list of (amazon) ip’s to the set without individually doing the chore?

    Reply
  • KarinKarin

    Been using ipset for years. Love it. Thought I pass along additional commands.

    To save ips before a reboot, do the following:
    Example below uses blacklist as the name, the file blacklist.txt to hold the blocked ips and is located at ‘/var/block/blacklist.txt’.

    Fist, make sure iptables is not set to start automatically upon reboot. As ipset needs to be setup again with its ip lists and iptables will fail if it can’t find the ipset resources.

    cd /var/block/
    ipset -L blacklist > blacklist.txt

    Then after a reboot, do the following:
    ipset -N blacklist nethash
    for i in $( cat /var/block/blacklist.txt ) ; do ipset -A blacklist $i ; done
    service iptables start (Or, whatever you use to start iptables)

    ipset can also be used to allow entry into a certain area. That is, if you have a private area under a designated IP. You can code to add a ip to ipset, as in this example:
    Note: you will need to adjust sudoers on your system to allow for this to work.

    ipset -N private nethash

    Your code would send the command:
    ipset -A private 111.111.111.111;

    And, iptables will have a rule which is:
    -A INPUT -i eth0 -d (Your Server IP that holds the private resource) -m set ! –match-set private src -j DROP

    Once your user logs out or isn’t using the resource anymore, simply send the following command:
    ipset -D private 111.111.111.111;

    Of course, if the user is on a dynamic IP, this won’t work. Though, you could code to change the ip itself to 111.111.111.0/24 before adding to ipset and would require you to hold this info somewhere.

    To add a bunch of IP’s to ipset:
    This example uses the name blocklist and is located at /var/blocklist.txt
    Add your ips one line at a time to the blocklist.txt file.

    Then run the following:
    for i in $( cat /var/blocklist.txt ) ; do ipset -A blocklist $i ; done

    Then add the rule to iptables, such as:
    -A INPUT –match-set blocklist src -j DROP

    Reply
  • KennethKenneth

    ipset can be used by the new firewalld system that overlays iptables in CentOS 7. It will store ipsets persistently in XML files under /etc/firewalld/ipsets. You can reference them using “direct rules” in firewalld, a way to inject raw iptables commands into firewalld. The firewalld service will create the ipsets before it installs the rules that use them.

    (The firewalld documentation cautions you not to use the iptables service at the same time, but you can safely use the iptables commands to inspect the underlying rules that firewalld creates.)

    Reply
  • telcotelco

    i don know whats wrong, after a reboot there is no blacklist aviable.
    I must do again all commands for ipset
    – ipset create blacklist hash:ip hashsize 4096
    – iptable -I INPUT -m set –match-set blacklist src -j DROP
    – iptable -I FORWARD -m set –match-set blacklist src -j DROP
    – ipset add blacklist xxx.xxx.xxx.xxx

    ipset list shows me the correct output.
    apt install iptables-persistent

    i see now in iptables two files rules.v4 and rules.v6 wit the input for iptable
    after reboot
    ipset list blacklist
    – ipset v6.34: The set with the given name does not exist

    i don know where is my failure?

    Reply
  • Eric DanningEric Danning

    Just curious, I followed the instructions right up until the install of “ipset”….then it just says to go about creating the blacklist. My question is:…using WHAT application? I an mot that well versed in Linux (yet) and would just like to know HOW I’m to create this blacklist!? Any help would be greatly appreciated!!

    Reply
  • yacine adnaneyacine adnane

    hello one persone do access to my website and any change i do it on my website after a few minute its also happen on them website i am try find them website ip adresse to block it but i find him use cloud flare so any solution you can suggest it for me ?

    Reply
  • MatMat

    is this guide not compatible with debian 10, nginx & php 7.3 ?
    after every restart the blacklist is lost – i have done everything 1:1 from the guide

    Reply
    • Most likely it should be working on Debian 10 as well. What is in your /etc/iptables/ipset?

      Reply
      • MatMat

        /etc/iptables/ipset has this inside:

        create blacklist hash:ip family inet hashsize 4096 maxelem 65536

        Reply
  • MikeMike

    I live in a rental house with eight other tenants. We all share a connection to the internet through a wireless router. I am receiving unwanted udp packets from other tenants so I set up iptables to block them but I still see them listed in my arp table.

    This is my iptables listing:
    $ sudo iptables -L
    Chain INPUT (policy ACCEPT)
    target prot opt source destination
    DROP all — 192.168.1.59 anywhere
    DROP all — 192.168.1.126 anywhere
    DROP all — XboxOne anywhere
    DROP all — 192.168.1.127 anywhere

    Chain FORWARD (policy ACCEPT)
    target prot opt source destination
    DROP all — 192.168.1.59 anywhere
    DROP all — 192.168.1.126 anywhere
    DROP all — 192.168.1.127 anywhere
    DROP all — XboxOne anywhere

    Chain OUTPUT (policy ACCEPT)
    target prot opt source destination
    DROP all — 192.168.1.59 anywhere
    DROP all — 192.168.1.126 anywhere
    DROP all — XboxOne anywhere
    DROP all — 192.168.1.127 anywhere

    This is my arp table:
    $ arp -a
    router.asus.com (192.168.1.1) at d0:17:c2:ea:00:80 [ether] on wlan0
    ? (192.168.1.127) at ec:f0:0e:75:6e:5e [ether] on wlan0
    XboxOne (192.168.1.214) at b4:ae:2b:4e:bc:c5 [ether] on wlan0

    When the ip addresses appear in the arp table is iptables not working?

    Reply
    • ARP is a protocol that does the conversion between an IP address and MAC address. As you blocked normal traffic, then that should be sufficient. If you also want to get rid of the ARP entries, then you could use arptables. See the related blog post on arptables.

      Reply
  • Wes LangeWes Lange

    Thank you for the article. Since I use Linux Mint 19.1, I had to use the following format in the /etc/rc.local file:

    #!/bin/bash

    sudo ipset create blacklist hash:ip hashsize 4096
    sudo iptables -I INPUT -m set –match-set blacklist src -j DROP
    sudo iptables -I FORWARD -m set –match-set blacklist src -j DROP
    sudo ipset add blacklist 192.168.1.100

    exit 0

    I could probably get “/etc/systemd/system/save-ipset-rules.service” eventually running through systemd, but I am already familiar with “/etc/rc.local”.

    Reply

Leave a Reply

Your email address will not be published. Required fields are marked *

This site uses Akismet to reduce spam. Learn how your comment data is processed.